A re-implementation of an old UI element just made in svg and JS as a Vue 3 component using the composition API built with Vite.
# The Plan
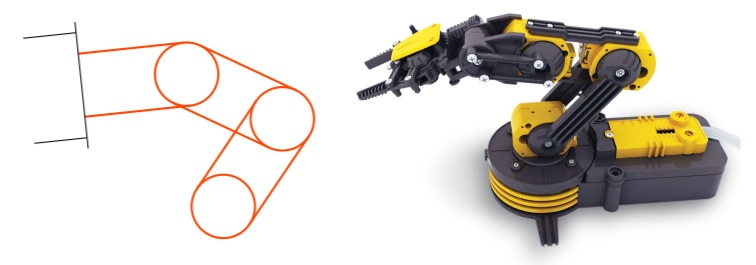
I had written in basic JS against and svg an arm schematic which reuses markup inside itself and apply rotate transforms, by nesting the transforms you get the linked rotations you expect from the arm joints. The code in this blog is simplified to highlight concept, the running source code is available above.
# Rewrite It In Vue
Mapping sliders to svg IDs tightly couples the logic and presentation, I think it's also just about the limit of easy interactivity to add.
If you're unfamiliar with svg or haven't seen <use> before here's a quick into;
<svg xmlns:xlink="http://www.w3.org/1999/xlink">
  <g id="shoulder" stroke="orange" style="transform-origin:350px 400px">
    <g id="node" stroke-width="2" fill="none" transform="translate(350 400)">
      <circle cx="0" cy="0" r="30"></circle>
      <line x1="-30" y1="0" x2="-30" y2="-100"></line>
      <line x1="30" y1="0" x2="30" y2="-100"></line>
    </g>
    <g id="elbow" stroke="orangered" style="transform-origin:350px 300px">
      <use xlink:href="#node" y="-100"></use>
      <g id="wrist" stroke="blueviolet" style="transform-origin:350px 200px">
        <use xlink:href="#node" y="-200"></use>
        <g
          id="jaw"
          stroke="deeppink"
          transform="translate(350 100)"
          style="transform-origin:350px 400px"
        >
          <line x1="-60" x2="60" y1="0" y2="0"></line>
          <line id="jaw-left" x1="-50" x2="-50" y1="0" y2="-50"></line>
          <line id="jaw-right" x1="50" x2="50" y1="0" y2="-50"></line>
        </g>
      </g>
    </g>
  </g>
</svg>
<g> to svg is like <div>, it means nothing itself except to group what's below. Every segment is a group, and in that group is the next segment. By applying rotate transforms to the groups you articulate each segment and its children. Second thing to note is the ID #node in the first group, that circle and 2 lines is an arm segment. By including xlink namespace in the svg root we get access to <use> whose source can be any anchor in the svg. We can design 1 arm segment and re-ruse that over and over.
Lots of that should sound familiar, we're going from svg > group > use > use > use to Vue Base Component > Joint Component > Joint Component > Joint Component. svg has one more handy trick, if we wrap the zero-segment design code inside <defs>(definitions) it will exist for use in the svg but isn't drawn. That way every segment that appears is a clone and none are special, which refactors to Arm.vue here (forget the end for a minute):
<svg xmlns:xlink="http://www.w3.org/1999/xlink">
  <defs>
    <g id="joint" stroke-width="2" fill="none" transform="translate(350 400)">
      <circle cx="0" cy="0" r="30"></circle>
      <line x1="-30" y1="0" x2="-30" y2="-100"></line>
      <line x1="30" y1="0" x2="30" y2="-100"></line>
    </g>
  </defs>
  <g style="transform-origin: 350px 400px;">
    <arm-joint />
  </g>
</svg>
// ArmJoint.vue
<template>
  <g ref="segment">
    <use xlink:href="#joint" y="100"></use>
    <component :is="node"></component>
  </g>
</template>
<script lang="ts">
import { computed } from "vue"

import ArmEnd from "./ArmEnd.vue"
export default {
  name: "arm-joint",
  components: {
    ArmEnd,
  },
  // ...
}
</script>
This now works for N arm segments, so we actually have Arm Base Component > Joint Component > * but for that we need ArmJoint.vue to be recursive. You must define a name used by <component :is="<name>" to make it dynamic and refer to itself. Once you enter recursion you must have a way to break out, we'll solve that by keeping track of the segment count inside the recursion. Once we hit zero then draw the ArmEnd.vue.
# Counting The Recursive Components
// App.vue
<template>
  <arm :joints="3" />
</template>
Specify the number of arm joints.
// Arm.vue
<template>
  <svg xmlns:xlink="http://www.w3.org/1999/xlink">
    <defs>
      <g id="joint" transform="translate(350 400)">
        <circle cx="0" cy="0" r="30"></circle>
        <line x1="-30" y1="0" x2="-30" y2="-100"></line>
        <line x1="30" y1="0" x2="30" y2="-100"></line>
      </g>
    </defs>
    <g style="transform-origin: 350px 400px;">
      <arm-joint :count="joints" />
    </g>
  </svg>
</template>
<script>
export default {
  props: {
    joints: {
      type: Number,
      default: 2,
    },
  },
  setup() {},
}
</script>
Pass that number into the recursive component("ArmJoint.vue") props from "Arm.vue".
// ArmJoint.vue
<template>
  <g ref="segment" :id="name">
    <use xlink:href="#joint" y="100"></use>
    <component :is="node" :count="count - 1"></component>
  </g>
</template>
<script>
import { computed } from "vue"
import ArmEnd from "./ArmEnd.vue"
export default {
  name: "arm-joint",
  components: {
    ArmEnd,
  },
  props: {
    count: {
      type: Number,
      default: 2,
    },
  },
  setup() {
    let name = computed(() => {
      return props.count <= 1 ? "arm-end" : "arm-joint"
    })
    return {
      name,
    }
  },
}
</script>
Unless we make armEnd a global component we need to specify it for each arm joint to be ready to use should we reach it.
Each iteration of the arm will decrement the segment count by one as it's passed to itself in a prop until we hit arm-end in the computed property template.
"ref=segment" can be accessed in vue 3 via let segment = ref(null) the vnode will be in segment.value which can apply the transformation property and click handlers.
// ArmEnd.vue
<template>
  <g :transform="`translate(350 100)`">
    <line x1="-60" x2="60" y1="0" y2="0"></line>
    <line ref="left" x1="-50" x2="-50" y1="0" y2="-50"></line>
    <line ref="right" x1="50" x2="50" y1="0" y2="-50"></line>
  </g>
</template>
This template doesn't use <component> which terminated the recursion.
# The Ugly Parts
# Vue Component Events
This doesn't use a global state handler so each component must provide an event binding to propagate clicks up to the parents. I've left that out from this post since it's an area I want to tidy up.
# SVG positioning
I'll spare repeating the whole set of components but due to the way I constructed the svg placing the groups by translated offsets, we're going to have to calculate those offsets each iteration. So definitely view the actual components code on gitlab where "ArmJoint" computes its offsets.
// ArmJoint.vue
<template>
  <g
    ref="segment"
    :style="`transform-origin: 350px ${400 + rootOffset}px;`">
    <use xlink:href="#joint" :y="rootOffset"></use>
    <component
      :is="node"
      :count="count - 1"
      :privateSegmentIndex="privateSegmentIndex + 1"
      v-on:update="pass"
    ></component>
  </g>
</template>
<script>
export default {
  props: {
    // ... count as before
    privateSegmentIndex: {
      type: Number,
      default: 0,
    },
  },
  setup() {
    //...
    let rootOffset = computed(() => {
      return props.privateSegmentIndex * -100
    })
    return {
      //...
      rootOffset,
    }
  },
}
</script>
Reading the script bottom-up, privateSegmentIndex is a private variable to count up the recursion levels. The arm segment in svg is 100px so the offset is index * length in the rootOffset computed property. It's negative just because of the drawing. That gets used to place the joint use drawing y position. Finally added to the initial root svg translate of 400 sets the rotation origin point.
That just happened to be the maths that works for this drawing, no doubt I could have change the drawing coordinates around to make that simpler but really I just had to pick one side to fix at the time.
The root SVG viewbox is also calculated from this but at the currently I just found values that scale ok between 1 and 10 segments. If you don't know what the viewBox is it's the mechanism svg has to decouple what you draw from what you see. That's how the arm segments are simply 100px offsets but as you add/subtract them or make the page responsive the size of the arm clearly changes.
# In Reality and the End Result
# The robot arm
Pretty quickly it was apparent that without any positional feedback from the motors in the arm the whole UI wasn't going to work. A workaround would be to "spring" the UI back to centre upon input release, thereby using the input as a binary up/down for the chosen joint. The problem remains however of indicating limits, as this was going to be used as a demonstration for primary or highschool students I can't leave the arm to drive into itself, it would strip the gears and students would do that all day.
# The rewrite
I took a lot to re-implement what as some JS selection, event handlers and clever svg. Some amount of effort went into just learning more about vue, but we're still not caught up to before.
With my current event handling in vue it's difficult to bind controls to or from the arm. The console does print out the segment name and angle ready to setup a listener.
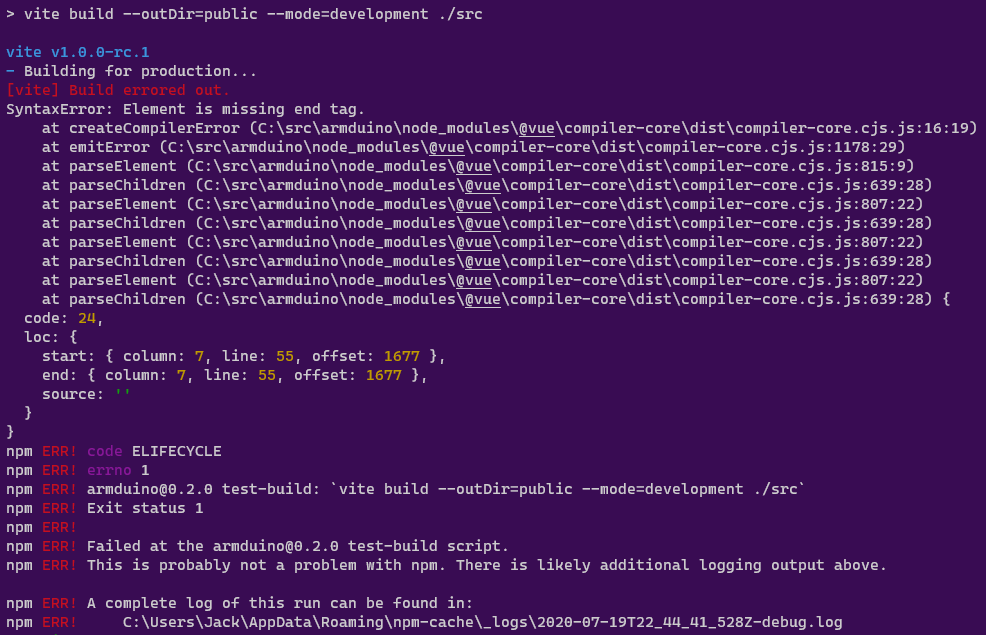
At one point vite threw back this gem upon building for production rather than a dev serve and I just can't tell what it actually had issue with. I just carried on with something else and eventually it would build. It's a little scary to get stopped by a brick wall of an error right as you try to deploy.
All told, Vite was super fast as promised, vue 3 and the composition API is very pleasant.